Now open Onag's 1000
tile template (hey, why go for anything less?).
It should be named something like
"1000tiles.PSD"
(if you don't have it, hurry up and download
it silly!)
Now zoom in w/ photoshop, until at a comfortable pixel editing level. (fig.1)
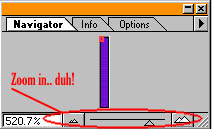 (fig.1)
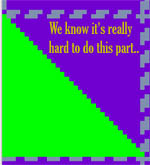 (fig.2)
Alright, now you obviously made the tile. What about masks? (transparency, what you'll stand on, etc.). Well, that's easy. NOT.
In reality, we'll try our best to make this as
un-confusing as possible, but since that is impossible,
you'll have to bear with us, and -not-
email us =).
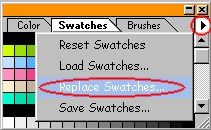 (fig.3)
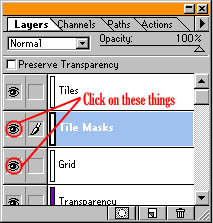
Now there should be an arrow to the right (see fig.3). Click on the arrow, then click on "replace swatches" (fig.3)
 (fig.4)
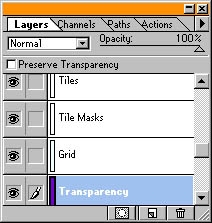 (fig.5)
Now, for a mask (what jazz can walk on, and what he can't), go to the "tile masks" layer (c'mon, you CAN do that, can't you?).
So, draw some white over the green
half, and black over.. well, the other half.
 (fig.6)
Alright.. now, turn off the "grid" layer, by clicking on the ugly eyeball to the left of it. (fig.6)
While you're at it, turn off the "tile masks" layer also.
In the upper.. uhm, left I guess, there is a menu called "Image." You can also press alt-i.
From that menu, go to "Mode," and then click on "Indexed Color..."
It should say something like "Flatten visible layers and discard hidden layers? Ok/Cancel." Click on OK.
Under Options, Dither, change it to "None"
See fig.7.
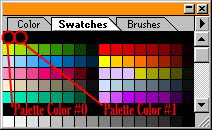
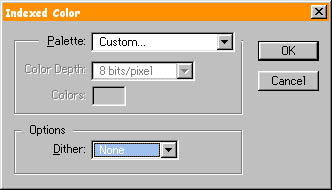 (fig.7)
Now load the "jazzpalette.act" file.
Then click on the obviously-sticking-out-in-your-face button called "OK."
SubNote: If you used a 255 solid-color green, it will change to a darker color, since the default Jazz Palette doesn't support that.. (although you can add it in if you want).
Make sure to save your copy as a .BMP file! .PCXs and some other formats kinda work, but BMP is the best in this case.
You should save this copy in the jazz2/tiles/
directory.
Alright, now take a deep-breath, ponder the mysteries of the universe, and get back to work. Load up your previously-saved .PSD file. Go to the old layers thingy again, and hide the layer named "tiles" and the layer named "grid."
Now convert to indexed-mode again, following the same steps as previously stated, and save a copy as a different .BMP file.. maybe mask.BMP.
As before, save this in the jazz2/tiles directory.
If you have any problems at this point, or earlier, or later, or outside the space-time continuum, remember, DO NOT EMAIL us. =)